Tuesday, February 25, 2014

Organizing Clay

A couple of years teaching elementary art can really change a man! I have probably learned more than I have taught over the last eight years and I know I have tons more to learn. One area that I have grown tremendously in is organizing clay days.


My first year of teaching I lost tons of clay projects. I relied on the students to write their own names on the bottom of the clay pieces. The names were often illegible and when students could not remember what their project looked like after the drying and firing process they were near impossible to return. My current system takes away much of the stress and heartbreak that I felt my first year. I am fortunate to have a great clay storage rack with wooden shelves. I put rows of masking tape on the wooden shelves so students can write their name under the clay, on the tape!


When the students finish their clay projects they carefully carry them to the wooden shelf on the counter. They use a pencil to write their name on the tape and just put their clay on top of their name. The art room para professional, a parent volunteer, or I write the students names and a class code on the bottom of the clay later in the day. I know it's a little more time, but it offers peace of mind and allows the clay to be returned to the students much more easily! Also, because the name is on the clay and on the tape I can match them up as they are loaded and unloaded from the kiln, so I am sure none of the pieces are lost!


Here are some first grade big mouth fish all lined up on their tape strips, ready to be stored for drying.


First and second grade clay projects are lined up on the drying rack before their bisque firing. (I'll have to have a separate post about loading the kiln, that too has become a fine art of it's own.) You might have noticed the colorful rectangle on the closest right corner of each shelf. Those are labels that tell the grade level and the day that the class attends art. My school has been experiencing some recent growth spurts and I am very thankful for the example clay projects that I make with each class. I give those to new students who have just entered the school and were not there on the day that the class made the projects. 


Sadly I don't have pictures of the glazing process. It's always a fun time. My tables are color coded, and I put glazes on each table based on the color. Students that want a blue-ish color go to the blue table, red-ish glaze is that the red table, etc. After the students have completed painting the glaze on their clay pots, they simply have to return them to their names on the wooden shelves. Then I can load them into kiln for the final firing.

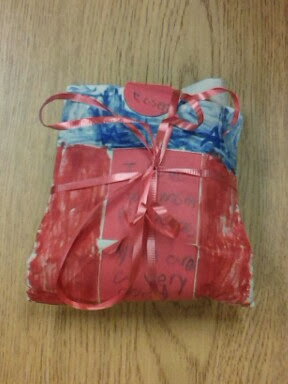
After the glaze firing, I help the students wrap their projects in newsprint. This year I received a donation of printer sized sticker paper. I used a large paper punch to make circular seals for the paper. Students write their name, maybe a gift message, and decorate their packages with markers. 


I even found the time to break out the curling ribbon for a couple of classes. 


The favorite part of the whole process is seeing the smiles of the students as they take those carefully packaged items out of the art room. 

Do you have any special tips to share about organizing the room for clay? What are some of your favorite clay projects?


Follow my blog with Bloglovin

Clay Tools

Students have been having a blast with clay projects recently! I am always looking for new tools to use with clay, and have picked up a few new favorites. 


All of the tools are stored as assortments for each table team. My supply room had an overload of plastic clam shell boxes, the kind that you might buy a pound cake in from the grocery. I break them by bending the plastic hinge back and forth until it comes apart. These boxes have become the go to storage accessory in the art room. You may also notice at the top of the tray there are some long kitchen skewers. The skewers work great for scoring the clay or for making small holes to add wire or string after the clay items have been fired.


Standard clay tools are the first in the box. Students use these for scoring the clay and for pressing into the clay to make a variety of textures.


I like to include recycled items for adding texture. Some objects come from the art room. Spool end pieces from rolls of banner paper make radial designs when pressed into clay. Great repeated circles can be achieved with this plastic glue stick holder. 


Bottle caps in all sizes can be pressed into or rolled along the clay to make different designs. I encourage the students not to press these into the clay like cookie cutters and cutting circles from the clay. The clay tends to get stuck in them. 


One of my new favorite recycle items is the handle from disposable razors. The kids get a kick out of them, and they can be pressed into the clay along their length or on the end.


It seems fitting, as a Florida school,  to have an assortment of sea creature toys and shells in our tool box.


Sometimes, I find a random fork in the parking lot that gets added to the collection.


What are your favorite unconventional clay tools?

Monday, February 17, 2014

Designing Solutions

One of the things that I would love for my students to take away from art class is that there are always more than one way to solve a problem. I have noticed recently that I assign rather large projects that take us a considerable amount of time to complete. A project can take three to four weeks when I only see the students for a single 50 minute class a week. I have been trying to plan some little activities that will encourage the kiddos to think of multiple design solutions in a short amount of time. 

Last week, when students were done with their main artwork, I gave them some free draw paper and had them draw some quick portraits. I encouraged them to make as many as possible in a short amount of time.


This weekend, I stumbled upon a similar quick draw activity that ties in to one of my hobbies. Generation Q, a quilting magazine, offers its readers a fun activity called Block Builder. Click on the link to go to their page for a template. The template has a starter quilt block (a square with a few scattered lines) that is repeated six times on the page. The game is to add lines and colors to finish the block. I printed off a couple of copies of the starters to take with me to pass the time while I was waited at an appointment. I added lines first with a pen and even used some of the toys from the kiddie area of the waiting room to make the curves.


After I colored them in I couldn't help but imagine what the squares would look like if they were repeated and arranged like a quilt top. I took some time to scan them to my computer and create some quilt top mock ups. It was a fun challenge, and allowed me to look at many different design solutions without being afraid of making a mistake. In the end there were designs I really liked and some that I did not, and that is OK!
I like how this one has a little depth.

Some of the curves I traced with the kiddie toys.